I had a plan to give my desk a quick and easy makeover. I walked through most of the simple steps to get me from the before to the after in my head before I even started. Sure, there were a few unknowns that I’d need to figure out along the way, just like with all of my projects, but I was confident that those unknowns would become obvious as the project went along.
Unfortunately, after implementing many of those steps over the weekend, I’m not pleased with how the desk is turning out. It’s salvageable, and the desk will get done, but I just made some design decisions that didn’t end up working out. So let me show you what I did, and explain how I plan to fix it.
First, I’ve already gone over how I made the side panels with the vines. If you missed that post, you can read it here. So here’s what the side panel looked like last time I showed you.

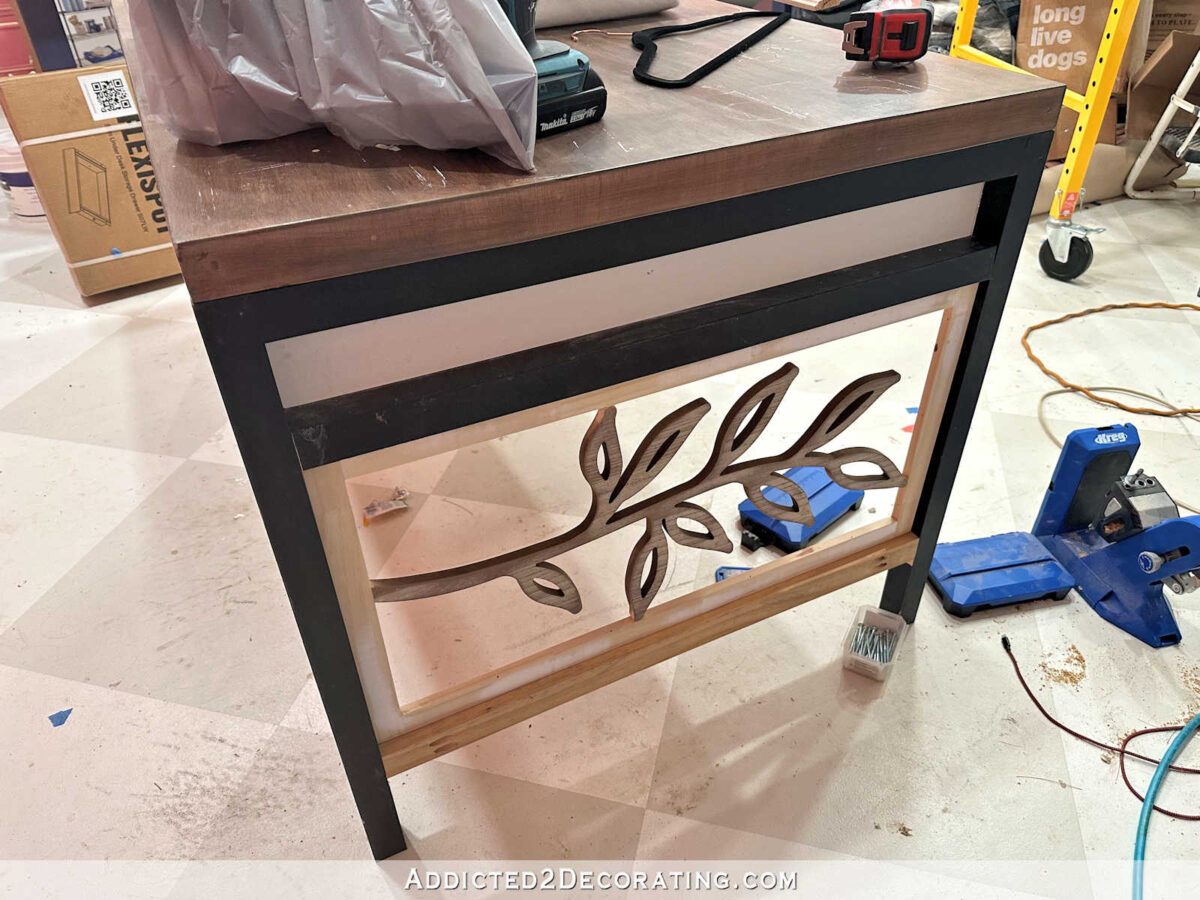
And here’s what it looked like after I cut off the excess frame pieces and attached the stretcher board below the framed vine insert.


I was so excited to get this side finished, and so focused on making sure that the vine was pointing towards the front of the desk, that I somehow missed that I installed it upside down. In my head, the vine needs to go up (plants grow towards the sun) and not point towards the floor. I was so bummed that I didn’t even notice that it was upside down, but it was glued in on top, and nailed in on all four sides, so I didn’t want to take the chance of removing it for fear that I’d break it. So I put the other panel in upside down also.


You may notice that I attached the bottom stretcher pieces with the pocket holes visible. That’s because (1) it was easier to attach it this way rather than with them on the bottom, and (2) I had already decided to add some decorative trim to the desk, so these holes will be covered up.


Next, I needed to fill in the space around the top of the desk so that the drawers that I plan to add won’t show on the sides and back of the desk. So I used some 1″ x 4″ lumber, cut them to length, and nailed those in place.


I had to miter those pieces where they met in the corners so that no ends would show from the back or sides of the desk.


And then I stood back and looked at the progress, and it just got worse. Putting those boards on the inside of the desk like that kind of gave a paneled look (like an inset panel cabinet door) except that the panel was set back 1.5 inches. That’s way too much. And it also looked strange that the panels on the top were set back 1.5 inches (attached on the inside of the 2″ x 2″ boards that make up the frame of the desk), while the framed vine panel was only inset about 1/2-inch (set in the middle of the 2″ x 2″ boards that make up the frame of the desk). That just looked like a design mistake to me. To my eye, those two things — the top panels and the framed vine panels — should be set at the same point on those 2″ x 2″ boards that make up the frame of the desk.


Here’s another view so you can see what I mean. To put it a different way, the top panel and the bottom framed vine panel should be on the same plane. There shouldn’t be that discrepancy where the top panel is set back further.


So before making any knee-jerk decisions, I decided to put the top back on on the desk (it’s just sitting there, it’s not actually attached) to get an overall view. And then it looked strange to me that the desktop is the same dimensions as the base. That looked fine to me with its original, simple, modern design. But with this new design, and the addition of the panels, I think the desktop needs to extend past the base like a more traditional desk design.


Technically, these aren’t difficult problems to fix. The hardest thing will be removing those framed vine panels without ruining them. But even if I have to remake those frames around the vines, it will be worth it. I should have corrected it after I installed the first one upside down, but I just wanted to get finished, and I pressed on. I should know myself better than that by now. I should have known I’d never be satisfied with that compromise.
And for the upper panels, I just need to use my table saw to cut some boards that will actually fit inside the frame pieces rather than simply attaching the boards to the back of those pieces. And then extending the desktop before adding the veneer will be a simple step. So it’ll all work out in the end. I just wish I had stopped and corrected my mistake when I installed that first panel upside down. I can fix it, but I’ve made things harder on myself than they needed to be. I hate it when I do that. It seems like I would have learned by now, but some of us are very slow learners. 😀
Addicted 2 Decorating is where I share my DIY and decorating journey as I remodel and decorate the 1948 fixer upper that my husband, Matt, and I bought in 2013. Matt has M.S. and is unable to do physical work, so I do the majority of the work on the house by myself. You can learn more about me here.


